2024-03-08

Phipps Arch and Bowington Arch

Two in One hike!

Phipps Arch and Bowington Arch in a day hike. About 10 mile.


Maverick Bridge

This hike starts along highway12. The trail goes along Escalante river, then at the split, go right to go to Phipps Arch. Walk in the Phipps wash. 0.6 mile walk in the wash, there is a side canyon to see Maverick Bridge. Topo map and Alltrail map are both wrong about Maverick bridge location marked. It is easy to tell the location is wrong if you are there, since the location is really over the cliff. It is a small bridge, but you can walk on the bridge and fun. 


Phipps Arch


View from the arch area


Then go back to Phipps Wash and continue the walk. Since Phipps Arch is above the canyon, one needs to go up the side rocks. The arch is not at all seen from the bottom. The last section is scrambling. After several legs and arm work sections, suddenly the arch vision comes in. Phipps Arch is very impressive. It is really thick. It resides at the top of the surrounding canyon like a king. The canyon below the arch is quite nice, too. Indeed 360 view from the arch. 


From other side
You can walk under the arch to see the arch from other side. The left picture is Phipps Arch from the other side. You might be able to see the register box under the arch in the first picture. I signed it for fun. The last person who signed was on the thanksgiving day, which was exactly one month before we did on 2023/12/22. I guess I am the last person at Phipps arch in 2023, because weather forecast was saying it would get much colder after the next day we hiked to Phipps Arch. 
There are a number of round rocks around Phipps Arch as you can see in the left picture. It is interesting to see them. We enjoyed so much Phipps Arch in complete solitude. Then we headed to Bowington Arch by tracing back Phipps Wash. At the split, we went left this time to go to Bowington Arch. First, some more Escalante river trail, then Bowington Arch trail. I don't know these trail names are official, though, because Bowington arch trail is just wash.

Bowington Arch


Bowington Arch is quite impressive, too. Arch is above the dry pour-off and it is dangerous go under the arch, but you can scramble up to just before the arch's bottom. We sat down a little further down to get the best view of arch and had a snack break. During the break, Mr.N said, "I can't find my blue hat since I was at Phipps Arch, but I did very thorough stuff check there" 

For a moment, I was "....", because, THE BLUE HAT was RIGHT BEHIND HIS NECK. 

We traced back to the trailhead. Although several cold Escalante river crossings, this was a great hike. 

After coming back, when I write blog about hike, sometimes I again search the trail on the internet. I found that on the way to the Bowington arch, there is rock art called "43 Men Red Men Panel" Darn, we missed it, but someday I will come back.


2024-02-23

Peek-a-Boo and Spooky Gulch, Utah

 Great slot canyon experience! Really narrow. Narrower than you can imagine. 

3.5 mile loop including both Peek-a-Boo and Spooky Gulch with narrows from Lower Dry Fork trailhead.


Narrows
Lower Dry Fork trailhead is along the Hole-in-the-Rock road (26.2 mile drive of Hole-in-the-Rock road). First part is hiking through narrow. The narrows look narrow? After doing Peek-a-Boo and Spooky Gulch, I consider this is a wide narrows, although the word wise it sounds weird. 
 
Peek-a-Boo Gulch entrance
After this narrows, you will come to the entrance of Peek-a-Boo Gulch. The left picture is the entrance. This entering part is actually most challenging (it is better than the ending is a challenge in my opinion). There is 6 meters (20 feet) nearly vertical climb. Not too bad. There are moki steps and all dry. In the book I read in advance said often pool under the climb and the climbing rock is wet, which is not safe. First Mr.N climbed up. It might be difficult to see in the picture, but rope was left there. Rope is not tied anywhere, so anyway at least one person in the group needs to climb without rope. Once one person is up, next person can use rope (the first person need to hold the rope). Luckily I was able to use the rope thanks to Mr.N. After we both climbed up, a group of 5-6 people (most likely everyone was over 60 years old) came and heard screaming. They were not speaking English, but it was clear saying crazy. We proceeded the gulch, but we never heard they came into the gulch. Since we knew more obstacles would coming in the gulch, we decided not to help or chat too much with them. I judged unsafe for them. 
 
Double Natural Bridge in Peek-a-Boo Gulch

Go under rocks in Spooky Gulch
Right after the first challenge, several challenge continued as I read in the book. We needed both hands and legs and most of the time first threw a daypack to the top, then climbed it so that light body can be pushed up easily. Challenging but it was really FUN!! Also it is really cool to see double natural bridge in the gulch. It is very unusual thing. It was my first time double natural bridge in such a narrow gulch.
It is called Peek-a-Boo, because once go through the bridge, another bridge come into your view. Peek-a-Boo gulch is less than a mile and opens up quickly. 
 
 
Then there is 0.5 mile of open vista walk to the entrance of Spooky Gulch. This is called spooky, because it is dark in general, and one section one needs to go under the rock (I read some books and it might be possible to go over the rocks, though). 


Spooky Gulch

After this challenge, the Spooky gulch gets extremely narrow. There is no way to pass two persons at the same time. Due to that trailhead sign recommend one way loop (Peek-a-Boo to Spooky). I was much easier than Mr.N since I'm a smaller person. While I had fun here, Mr.N said it was exhausting due to narrowness. Daypack needs to be carry in front or side. No space to keep it put on the back. It is same as packed Japanese train. You must not put a pack on the back. The picture with my foot can give you a sense how narrow it is.
foot in Spooky gulch
 
In any way, this is highly recommended hike to experience Grandstaircase-Escalante and slot canyons.

2024-02-09

Coyote Gulch, Utah

Coyote Gulch a spectacular place in the Escalante area. This was on my bucket list and I am so glad I explored Coyote Gulch. 

We did this as 2 night/3 day backpacking. Round trip 26 miles (plus some side trips). To go to Coyote Gulch there are several approaches. We chose the easiest way via Hurricane Wash. Other ways require 4WD with high clearance car to reach the trailhead. We had an AWD with not too high clearance, so we decided to be safe.
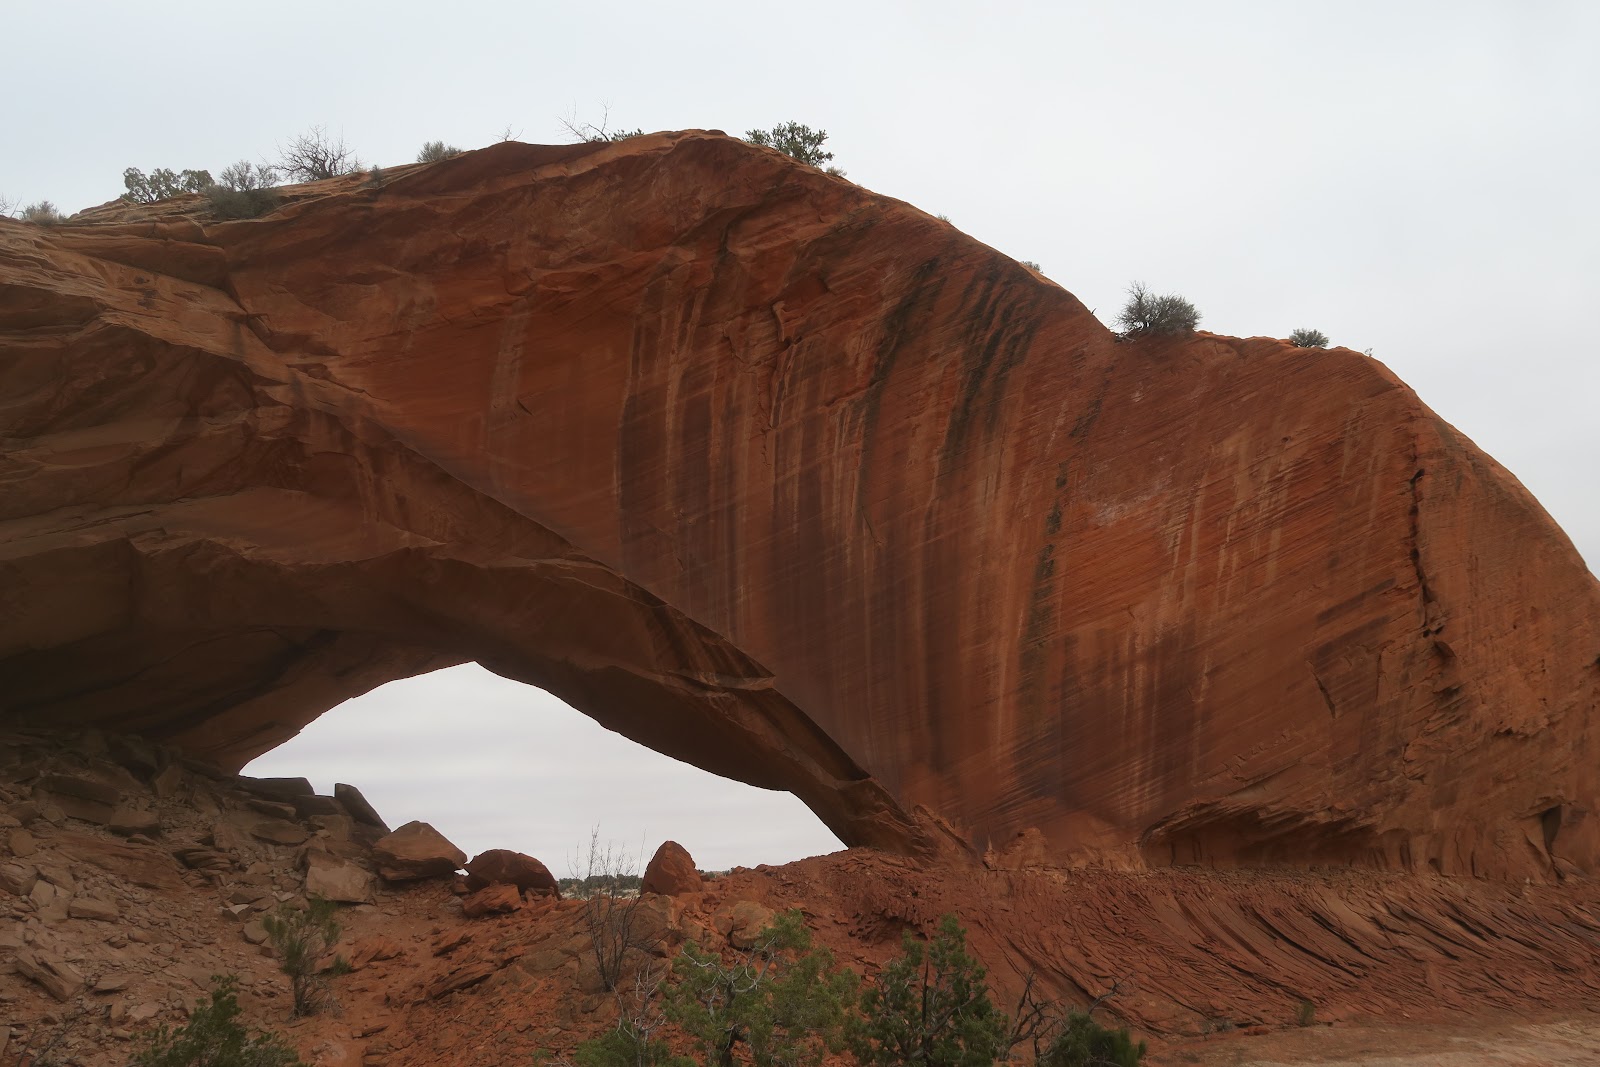
Jacob Hamblin Arch
First 6.5 miles is dry, mostly walking in the Hurricane wash. At 6.5 mile, you see a massive arch. Jacob Hamblin Arch. Fat, tall, magnificent arch. There are several camping sites both sides of arch. We thought about camping here before start, but we arrived at lunch time there, so we took nice break here and continued hiking. From there, it is not avoidable to wet your feet. Every meander of the creek, a hiker has to cross it.
Coyote Natural Bridge

At 9 mile point, there is another breathtaking spot. Coyote Natural Bridge. Since this is a natural bridge, the creek goes through the bridge. The rock color is lighter, and desert varnish is more distinct. We climbed a side used trail to get a nice view from here. In the distance we saw a little remnant of ruins in the alcove. Fun. 


rock art
After passing Coyote Natural Bridge, we found a petroglyph high up the canyon. There is a used trail to go up there: why not checking out? The trail was steep, but it was worth the workout. Now nobody can tell what the art mean, but it is really fascinating to see it. There are two colors: white-ish and brown-ish. Not sure it is a human or some sort of trademark for the tribe. The art was on the side of alcove. 


Pieces of corn, bone, pots
When we checked out the alcove, there are signs of ruin, although most of it was no longer intact. There are many corns, pieces of pots, ropes, bones are left. Those things were on the remains of ruins as you can see in the left picture.
Corn are very small. I can imagine their tough life in 8000 years ago.

11 miles in, we reached the saddle that had an excellent view of Cliff arch. We set up a camp there. AWESOME VIEW! The picture below was taken from our campsite. Evening light reflect on the rocks and the color became firing orange. What a glorious color. 

Not everybody sees Cliff Arch from this angle. In fact, most people stay at the river level and not climbing up the saddle. I watched a Youtube video doing day hike in Coyote Gulch and he stayed at a lower level, because he was so tired at 38C (100F) weather in late June. Understandable at 38C, you want to stay close to water and not sun exposed dry saddle. From below, the view will be the next picture. The same arch, but it looks completely a different thing. I like the both directions, but I am glad I saw the full of arch hole. In the evening I was even able to see the shadow of arch hole on the back rock wall. How cool it was.
Cliff Arch

Cliff Arch from another angle
The next day we left a tent and proceeded to Crack in the Wall as a half day hike. The another angle of Cliff arch was seen on the way to Crack-in-the-Wall. Literally, there are cracks (three) in the wall at Crack-in-the-Wall. It is another way to go to Coyote Gulch from another trailhead, but it needs good high-clearance and 4x4. Also rope is needed. We didn't plan to go out via Crack-in-the-wall, but went there to enjoy the view. The view was incredible! Escalante river down, and up can you see the huge Stevens Arch?

View from Crack-in-the-Wall


We found a good viewpoint for Stevens Arch. This arch is immense. Nobody around, all ours!
Stevens Arch

After we enjoyed the view, we traced back to the campsite, and proceeded back to Jacob Hamblin Arch and camped on the 2nd night. Day3 we traced back to the trailhead.

We saw 2 dayhikers at Jacob Hamblin Arch who came via Crack-in-the-Wall on day1. I think they came back to Water tank trailhead via sneaker route. On day3 in the morning we saw a day hiker going to Jacob Hamblin Arch in Hurricane wash. Other than that, nobody. Our most remote day was day2, and that day absolutely nobody in the gulch! It was so so worth it with great view in complete solitude.


2024-01-26

Kodachrome Basin

Kodachrome Basin State park was one of the places we skipped in 2020 Utah winter trip. We skipped that time because 1) time restriction 2)fee. Utah state parks require fees to enter. There are so many places to hike in the vast BLM in Utah. Why do I need to pay? That's what I thought, but after hearing some good things about Kodachrome, 3 years later we came back to check it out.


Ballerina Spire
First we did Panorama trail-Cool Cave loop. Total 6 miles with minimal elevation change. Easy and scenic hike. Kodachrome basin is very pretty. It was much more stunning scenery than I had expected. There are many spires and chimneys in many colors. Rocks and mountains are colorful, including orange, white, gray, brown and so on. One of the biggest spires in the park is ballerina spire. Indeed, it is distinctive and spotlight-worthy tall and straight like a ballerina. It can be seen in the long distance. The spire is not monotonous color. It consists of orange, brown, light brown, white. It really spires tall in the background of blue sky.


Cool Cave
Another interesting point is Cool cave. It is a cave actually its micro environment is chilly. It is cool to see that. When we were in the cave, the voice echoed. Even walking sounds echoed.

From Panorama point

A small spur trail to panorama point is very nice. The view is fantastic. 

We had a little more time before sunset after the panorama loop, so we did Angel's Palace trail (1.5 mile). This was also a quite scenic loop, and we did in the best time frame. The evening light reflect the mountain and it was gorgeous color to see. 

Evening light reflection


One more bonus was nobody (again) was hiking in the park. The big parking lot that can hover 30-40 cars was completely empty. Solitude is great.


2024-01-13

Golden Cathedral, Utah

Golden Cathedral

Golden Cathedral, stunning and dramatic double natural bridge. 

My bucket list had Golden Cathedral in the Escalante area in Utah for some time. The Golden Cathedral is often used as the iconic symbol in the area. I had seen in the picture on the internet, but I really hoped to see in person some day. It became true!

It is about 10 miles (out and back) via Fence Canyon approach. The Golden Cathedral is in the Neon Canyon, which is a side canyon of Fence canyon. To reach the trailhead, there is total 26 mile of dirt road drive. 16 miles on Hole in Rock road, and 10 miles on Egypt road. Especially the last couple of miles are rough. At least AWD is needed, 4WD is better for sure.

We hiked this on December 21st, 2023. Who hikes in late December at -12C (10F) and crosses 10 times the ice-cold Escalante river?

NOBODY. 

No car at the trailhead in the morning, no one for the entire day on the trail, no car at the trailhead at the end of the day. According to the trail registration, we were only 2nd group in December to hike into Golden Cathedral. I love this. Complete solitude. The whole canyon and the Golden Cathedral was ours. What a priceless experience.

The view from trailhead
The trail is of course not signed, but well marked by carin, and going down into the canyons. Already the view from trailhead is amazing. The left picture was taken at the beginning of the hike. The scenery was pretty shining by morning light. First, the path goes down into Fence canyon. There is another approach directly going to Neon canyon, but it is more route finding work needed. 

First crossing point of Escalante river


After a while, we reached the first (of total 10) river crossing point. The left picture is how it looks like. Escalante river is a bit muddy, not-clear water. You might think it is not so deep. It is important to know that all river looks much more shallow than you think. Also, it seems not so strong current. Another mistakes many hikers make is underestimate the strength of current. One more point---the picture looks pleasant on a sunny day to cross this for you reading this in a heated room. This was the day of -12C (10F)! The river was actually deep. It was deep enough to wet my butt (yup, underwear got wet). The current was much stronger than the first look. Luckily the first one was the deepest and the other 4 places were thigh depth. 

Right after 5 crossings was first reward! The large panel of petroglyph! Can you see how many objects on the wall in the left picture? Human, bighorn sheep, bird footprints, circles, lines, etc. A lot of mysterious art can be found on the wall. Here, you can spend hours to admire these!

Soon after this rock art panel, there is a junction to go into Neon canyon. Compared to Fence Canyon, Neon Canyon is narrower and high canyon walls at the both sides. The walls have countless black varnish, which is impressive. Soon after entering Neon canyon, Golden Cathedral showed up. Neon canyon continues, but lower approach, Golden Cathedral is the end. Upper approach you can continue. 

Golden Cathedral! Quite a unique natural bridge to see. Feel like you are on the different world. Such an amazing and even eerie structure. Sun was coming into the deep canyon while we were sitting there, and it was nice to observe every minute the color get changing by sun. Wonderful time.


I ate CHOCO PIE at the Golden Cathedral. My favorite Japanese snack at an awesome spot. I believe that I am the first person who ate CHOCO PIE at the Golden Cathedral! (and I will be the last person I believe)

There is pool under the double bridge. The pool smells some bacteria or fungus in my nose. We went into the pool and looked up the bridge. It was cool. Such a nice day we had.

2023-11-25

The Last Season by Eric Blehm

 This blog is not directly related my own hiking. It is a book review. Don't worry. It is still related to hike. Even better, it is a story happened in Sequoia and Kings Canyon National Parks. More specifically, it is a story about a backcounty ranger Randy Morgenson in Sequoia and Kings Canyon National Parks (SEKI). 

This is a book of 335 pages written in English, which is not my favorite language. I don't usually turn the page of English book with excitement wanting to know the next. Most of the time, I don't finish English book more than 100 pages. This book was an exception. I finish chore of the day and ran to this book every night. 

Randy was a very experienced backcountry ranger. Indeed he served 28 seasons in SEKI. This legend ranger, on his 28th season, he went missing in the middle of nowhere. Having missing own ranger in SEKI, they conducted biggest ever search and rescue (SAR), but he remained missing. 

Throughout the book from numerous stories from his family, his fellow rangers, his wife, letters from park visitors, it is easy to visualize his passion and philosophy into mountains and beauty of remote nature. I have common thing with him, loving remote nature, it was nice to dive into it. More pleasantly, it is nice to remember my John Muir Trail trekking and countless hikes in Sierra by reading about stories in Yosemite Valley, Mount Dana, LeConte Canyon, McClure Meadow, Bench Lake, Tenaya Lake, Rae Lakes, and so on. It is easy to read books where the stage is wilderness I have hiked in.

Story is not that simple as you imagine from beginning. Even in the remote beautiful place, human beings is human beings. Things could get ugly or complicated. It is ironic since some people go to remote wilderness to escape from ugly human relationships. 

I don't tell the detail since I want individual to read and find out, but I recommend this, especially if you are a hiker. 


2023-10-14

Presidential Traverse in a single day

One of the most scenic and intense hikes in New Hampshire is known as "Presidential Traverse" It is called that way since it goes through peaks of Presidential range. It is 22 miles with 8891 feet elevation gain. This covers Mt. Madison, Mt.Adams, Mt.Jefferson, Mt.Clay, Mt.Washington, Mt.Monroe, Mt.Franklin, Mt.Eisenhower, Mt.Pierce, Mt.Jackson. (Jackson is optional). Nearly entire route is rocky as East Coast standard. The terrain makes the journey slow down. It took me almost 15 hours including 1.5 hour break. 

First, I left the Boston area 2 a.m., then drove 3.5 hours. I started hiking at 6 a.m. Traditionally the starting point is Appalachia trailhead, and go south bound. The reason is because in this way the hardest part is the first half. First 3.7 mile is Valley Way trail and climbs up 3600 feet. There is a hut at the junction (Madison Spring hut). The hut provides potable water for hikers. This is great. The only spur of the Presidential Traverse is from here to Mt.Madison. 0.5 mile to the summit, so 1 mile spur. I summited Mt.Madison at 8:17 a.m. After I came back from Mt.Madison, I ate a rice ball at the hut and refilled my bottle with water. Then I headed for Mt.Adams. This is the most rocky area of the hike and usually you follow small paint on the rock. I missed somehow the paint and I went to Mt.Quincy Adams (this is not included in Presidential range). This is just a small mountain on the way to Mt.Adams. I used my extra energy. I went back to the trail and summited Mt.Adams at 9:41 a.m. Another 2 miles, I summited Mt.Jefferson at 11:12 a.m. I was getting tired and got slowed down. Another 1.5 mile, I summited Mt.Clay at 12:20 a.m. Another 1.5 mile, I summited Mt.Washington at 1:25 p.m. Because there is an auto road to Mt.Washington summit, there were tons of people there. There is a food court but it was crowded like Walmart. I didn't want to stay there, so I didn't take a break and continued. Hiking down 1.5 miles, I reached Lake of the Clouds hut. I was able to take a break in not so many clouds there. From here I stopped recording what time I summited each mountain. Too tired to record.

Then I summited Mt.Monroe, Franklin, Eisenhower, and Pierce. At the Mt.Pierce, there was a choice to go back straight to the trailhead, or detour to add Mt.Jackson. I got my second wind and decided to add Jackson. Around 9 p.m., finally I finished! I got a crown! 

To celebrate I ate at Burger King at 10:30 p.m. and got chocolate shake. Finally went back home around midnight. It was a long day. By doing this, I beat my record. Now my personal record of elevation gain in 1 day is 8881 feet. (It was Mt.Shasta with around 7700 feet).
Mount Washington from Mount Monroe